


Imagine stepping into a cool, invigoratingly crisp room on a sweltering summer day. This is the comfort your air conditioner can provide when it’s maintained flawlessly. You should start by inspecting and replacing air filters monthly to guarantee ideal airflow and air quality. Next, the condenser coils require thorough cleaning to prevent inefficiency and potential breakdowns. Don’t overlook the importance of checking your system’s refrigerant levels; incorrect amounts can greatly impair efficiency. Regularly clearing drain lines prevents water leaks that could lead to costly damage. Now, let’s explore how these critical steps, along with several others, contribute to prolonging the life of your AC unit and ensuring it runs at peak performance.
Check and Replace Air Filters
To ensure the peak performance of your AC unit, regularly check and replace the air filters. Maintaining ideal filter efficiency isn’t just about comfort; it’s about ensuring the air you and your clients breathe is clean, reducing the workload on the AC system, and ultimately conserving energy.
The recommended maintenance frequency for changing your filters can vary, but a general rule of thumb is every 90 days for typical residential settings. However, if you’re servicing environments with high dust levels or pet dander, or if you’re in a region with high pollen counts, you might need to replace the filters more frequently, potentially every 30 to 60 days.
Understanding the types of filters and their specific replacement guidelines is important. Filters are rated based on their ability to trap particles. The Minimum Efficiency Reporting Value (MERV) rating measures this, with higher numbers indicating better filtration. For most residential systems, a MERV rating of 7 to 12 is sufficient, but a higher rating might be necessary for those with severe allergies or in particularly dusty environments.
Clean Condenser Coils
Clean the condenser coils regularly to maintain your AC unit’s efficiency and prolong its lifespan. Over time, these coils can become clogged with dirt, debris, and grime, reducing your system’s ability to expel heat effectively. This buildup strains your unit and leads to higher energy consumption and costs.
Understanding the right coil cleaning techniques is essential. Start by shutting off the unit’s power for safety. Remove any large debris manually, and then use a commercial coil cleaner to dissolve the remaining buildup. A soft brush or fin comb can help dislodge stubborn dirt without damaging the fins. After applying the cleaner, rinse the coils gently with water, ensuring they do not bend or damage the fins.
Deciding between DIY vs professional coil cleaning? While routine light cleaning is manageable, professional servicing is recommended for a thorough deep clean, especially if you notice significant buildup or the unit’s performance has declined. Professionals have the right tools and expertise to restore peak functionality without risking damage to your system.
Inspect Evaporator Coils
After inspecting the condenser coils, check the evaporator coils for any signs of buildup or damage to guarantee the peak performance of your AC system. The evaporator coils play an essential role in the heat exchange, absorbing heat from the air in your space to cool it down. However, these coils can accumulate dust and debris, which insulates them and reduces their efficiency.
To maintain these critical components, first turn off the AC system to avoid any electrical hazards. Then, inspect the coils for frost accumulation, which may indicate other issues not covered here. If you spot significant dirt or corrosion, coil cleaning should be your next step. Use a specialized coil cleaner, available at most hardware stores, and follow the instructions carefully to avoid damaging the coils.
Regular maintenance of your evaporator coils offers significant efficiency benefits. Clean coils facilitate better heat absorption, enhancing your system’s overall cooling efficiency. This guarantees excellent performance and extends your unit’s lifespan, preventing costly repairs in the future.
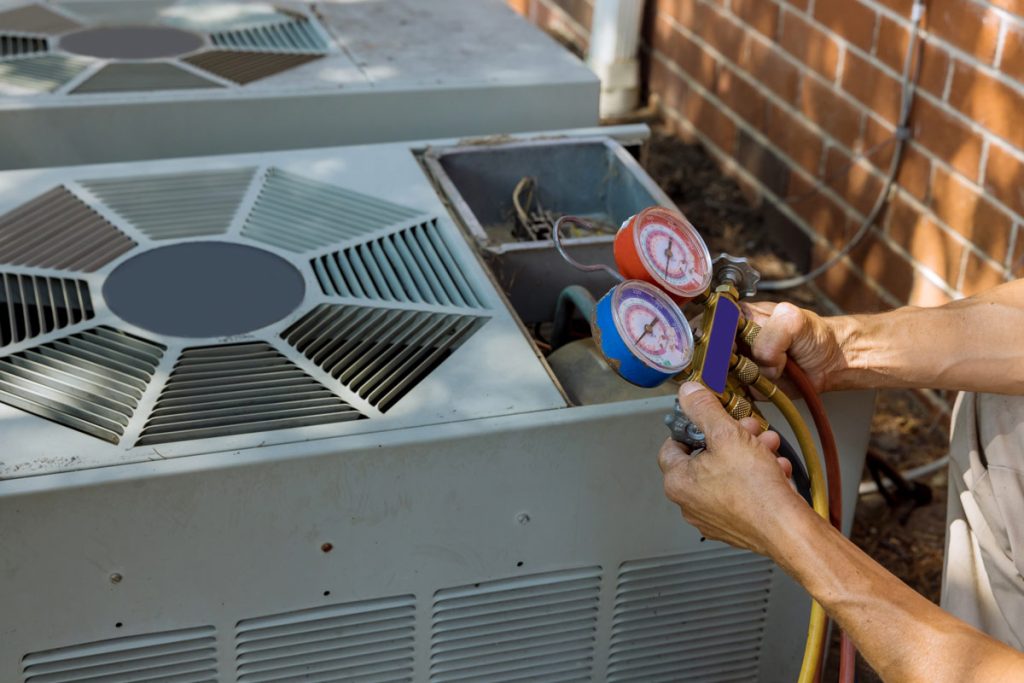
Verify Refrigerant Levels
Check your AC system’s refrigerant levels to guarantee it operates at peak efficiency. Maintaining the correct refrigerant levels is vital, not just for system efficiency but also as a fundamental aspect of preventative maintenance. When the refrigerant levels are low or uneven, it can lead to increased energy consumption and reduced cooling power, ultimately stressing your AC system and reducing its lifespan.
Here are key steps to make sure your refrigerant levels are at their best:
- Leak Detection: Regularly inspect for leaks, which are the most common cause of low refrigerant levels. Utilize specialized equipment to detect refrigerant escaping, preventing further system degradation.
- Pressure Checks: Measure the pressure of the refrigerant to ensure it matches the specifications recommended by the manufacturer. Incorrect pressure can be an indicator of underlying issues.
- Professional Assessment: Engage a certified technician to perform detailed assessments and refills. Handling refrigerants requires expertise due to their chemical properties and compliance with environmental regulations.
Assess Thermostat Functionality
Once you’ve verified the refrigerant levels, evaluate your AC’s thermostat to ensure it accurately controls the system’s functions. Proper thermostat calibration is essential for maintaining temperature accuracy and ensuring energy efficiency. This helps provide comfort and supports your mission to serve by optimizing energy use and reducing costs for those you assist.
Start by checking if the thermostat maintains a consistent temperature as set. Recalibration may be necessary if there’s a discrepancy between the temperature displayed and the actual room temperature. Use a separate thermometer to verify the thermostat’s accuracy. If you find a significant variation, it’s an indicator that the thermostat may be misreading the ambient temperature, leading to excessive cooling or heating cycles.
Also, consider the placement of your thermostat; it should be away from direct sunlight, drafts, and any heat sources, as these can affect its performance. Upgrading to a programmable or smart thermostat can enhance energy efficiency, allowing for automatic adjustments that align more closely with usage patterns and occupancy.
Examine Electrical Connections

Frequently Asked Questions
Verify all electrical connections in your AC system are secure and corrosion-free to prevent potential failures and guarantee peak performance. Prioritize safety precautions while performing these checks to ensure the best functioning of your system and protect yourself from potential hazards.
When examining your AC’s electrical components, consider these key steps:
- Voltage checks: Utilize a multimeter to measure the voltage levels at different connection points. This helps identify if any fluctuations or abnormal readings exist, indicating potential issues.
- Wiring inspection: Carefully inspect all wiring for signs of wear, fraying, or corrosion. Ensure all wires are properly insulated and securely attached to their respective terminals.
- Safety precautions: Always turn off the power supply before beginning maintenance. Use insulated tools and wear protective gear to safeguard against accidental shocks.
These measures are essential to maintaining your AC unit’s reliability and efficiency. By conducting regular inspections and addressing issues promptly, you’ll extend the lifespan of your system and enhance its performance, ensuring it operates safely and effectively for everyone relying on it.
Clear Drain Lines and Pans
Make sure you clear the AC unit’s drain lines and pans regularly to prevent blockages and overflow, which can lead to water damage and reduced system efficiency. This task is vital as part of your preventative maintenance routine. Over time, dirt, debris, and algae can accumulate in these areas, obstructing condensate flow away from the unit.
To begin, locate the drain pan beneath your indoor evaporator unit. If water is pooling, it’s a sign that the drain line is likely clogged. Start by removing any visible water with a wet-dry vacuum. Next, use a specialized drain brush or a mixture of vinegar and warm water to gently clean the drain pan and pipe, making sure you remove all sediment and biofilm buildup.
Flush the lines thoroughly after cleaning to ensure all debris has been cleared. Consider installing a time-release algaecide tablet in the drain pan, which will help prevent future algae and mold growth and minimize risks associated with these contaminants. Regular drain cleaning of your AC’s drain lines and pans is essential for preventing water damage and mitigating mold risks. This not only maintains system efficiency but also protects your health and property.
Evaluate Blower Components
After confirming that the drain lines and pans are clear, evaluate the blower components to maintain peak airflow and system performance. The blower assembly, integral to your AC’s functionality, consists of several key elements requiring meticulous attention.
Firstly, inspect the blower motor, which is the heart of the assembly. Check for signs of wear or damage, such as rust or unusual noises during operation. It’s important to ensure the motor functions efficiently, as a faulty motor can lead to reduced airflow and increased energy consumption.
Next, take a look at the fan blades. These should be free of dust and debris to prevent any imbalance, which can cause strain on the motor and lead to premature failure. Here are specific aspects to take into account:
- Blower motor condition: Look for any signs of overheating, such as discolored windings or a burnt smell.
- Fan blades alignment: Ensure they are properly aligned and securely attached to the motor shaft.
- General cleanliness of the blower assembly: Dirt and debris can hinder performance, making thorough cleaning necessary.
Perform System Calibration
Now, proceed with calibrating your system to guarantee peak performance and accuracy. Calibration of your AC system isn’t just a routine check; it’s a critical step in ensuring that all components operate at their best settings, which is crucial for efficiency optimization and performance enhancement. This process involves adjusting the thermostat and checking that all sensors function correctly, which can greatly influence the system’s effectiveness.
When you calibrate your AC, you’re essentially fine-tuning it to perform effectively under your specific conditions. This tailored approach not only helps reduce energy consumption but also extends the unit’s lifespan, offering significant maintenance benefits. Ensuring that the cooling and heating sequences are correctly synchronized prevents the system from undergoing unnecessary stress, which can lead to premature wear and tear.
Moreover, accurate calibration can detect any system performance discrepancies early on. This preemptive measure allows you to address potential issues before they escalate, ensuring that the system continues to serve your needs without unexpected disruptions. Remember, a well-calibrated system is more than just an operational unit; it’s a critical asset in maintaining a comfortable, energy-efficient, and reliable environment.
Schedule Professional Inspection

Booking a professional inspection every year guarantees that your AC system maintains peak performance and uncovers potential issues before they escalate. While DIY maintenance tips are valuable for daily upkeep, the complexity of modern AC systems often requires a trained eye to assess and service them properly. Regular inspections are vital not only for ensuring operational efficiency but also for extending the lifespan of your unit, which, in turn, aligns with cost-saving strategies by reducing the need for premature replacements.
Key aspects of a professional inspection include:
- Systematic Checkup: A thorough examination of all components, from filters to thermostats, ensures everything functions correctly.
- Efficiency Evaluation: Evaluating the system’s efficiency can identify adjustments that save energy and lower your bills.
- Problem Prevention: Early detection of potential issues prevents major repairs, supporting a strategy to save money and avoid service disruptions.
You’re not just looking after your AC unit; you’re ensuring comfort, safety, and efficiency for everyone who relies on it. Remember, skimping on regular inspections can lead to costly repairs. Investing in a professional service is a proactive measure that keeps your system running smoothly and avoids the pitfalls of neglect.
Conclusion
Now that you’ve navigated through the ultimate AC maintenance checklist, you’re on your way to ensuring your system runs like a well-oiled machine. Don’t let your efforts evaporate. Schedule regular professional inspections. By keeping a keen eye on each component and promptly addressing issues, you’ll boost efficiency and extend your unit’s life. Remember, a stitch in time saves nine, so stay proactive in your AC care!