


You’re likely familiar with the frustration of a malfunctioning home AC system, especially during the sweltering summer months. Common issues like thermostat problems, refrigerant leaks, and dirty air filters can disrupt comfort and spike energy bills. Understanding these issues and how to address them can save you time and money. Imagine your home cool and comfortable again without the constant headache of repairs. Are you curious about tackling these problems effectively and keeping your AC running smoothly? Let’s investigate the solutions that can help you achieve just that.
Thermostat Problems
One of the most common AC issues homeowners face is a malfunctioning thermostat. You might think your AC system is broken, but sometimes the problem lies with the thermostat. A simple battery replacement could be the solution. Thermostats often rely on batteries to function correctly. When the battery is weak or dead, the thermostat can’t communicate with your AC unit, causing it to fail. Check the battery compartment, replace the old batteries with fresh ones, and see if this resolves the issue.
Another common problem is programming errors. If your thermostat isn’t set correctly, it won’t maintain the desired temperature in your home. Make sure you’ve programmed it according to your schedule and preferences. Refer to the manufacturer’s manual for specific instructions. A factory reset might sometimes be necessary to clear any errors and start fresh.
Additionally, make sure your thermostat is located in a suitable spot. Placing in direct sunlight or near heat sources could give inaccurate readings, causing your AC to work harder than needed. By addressing these straightforward issues, you can often restore your AC’s functionality without professional help.
Refrigerant Leaks
Refrigerant leaks are a serious issue that can severely impact your AC’s efficiency and cooling capabilities. When your unit leaks refrigerant, it can’t effectively absorb heat from your home, making it less efficient and driving up energy costs. To tackle this, you need to start with proper leak detection. Look for signs like hissing sounds, ice buildup on the evaporator coils, or reduced cooling performance.
Once you’ve identified a leak, the next step is to fix it. This often involves sealing the leak, which you can do with a commercial sealant or by calling a professional. After sealing, you’ll need a refrigerant recharge to restore the system’s cooling capacity. A technician will add the correct amount of refrigerant, ensuring your AC operates at peak levels.
Dirty Air Filters
Dirty air filters are a common culprit behind a poorly performing AC system. When filters become dirty, they obstruct airflow, reducing the efficiency of your unit and making it work harder than necessary. This can lead to higher energy bills and an uncomfortable home environment. Regular filter replacement is essential to guarantee peak performance.
First, locate your air filter in the return air duct or the blower compartment. Once you’ve found it, check its condition. If it’s covered in dust and debris, it’s time for a replacement. Most filters need changing every 1-3 months, but this can vary depending on pet ownership and indoor air quality.
Next, purchase the correct size filter for your unit. The wrong size can cause gaps, allowing dirt to bypass the filter and enter your system. Follow the manufacturer’s instructions for proper installation, ensuring the airflow direction arrow on the filter aligns with your system’s airflow direction.
Frozen Evaporator Coils
Frozen evaporator coils can severely hinder your AC system’s performance and often indicate underlying issues. When your coils freeze, it’s usually due to poor air circulation or humidity issues. To resolve this, you first need to check your air filters. Dirty filters restrict airflow, leading to frozen coils. If your filters are clean, the next step is to inspect the blower fan for any blockages or malfunctions affecting air circulation.
Another common cause of frozen coils is low refrigerant levels. If the refrigerant is low, the coils get too cold and can freeze up. You’ll need a professional to check the refrigerant levels and possibly recharge the system. Moreover, make sure your thermostat is set correctly. Setting it too low can cause the coils to freeze, especially if the AC runs constantly.
Humidity issues can also lead to frozen coils. High humidity makes your coils work harder, leading to potential freezing. Guarantee your AC unit is appropriately sized for your home, and consider using a dehumidifier. Regular maintenance, such as cleaning the coils and checking for leaks, will help prevent these problems. By addressing these issues, you can keep your AC running efficiently.
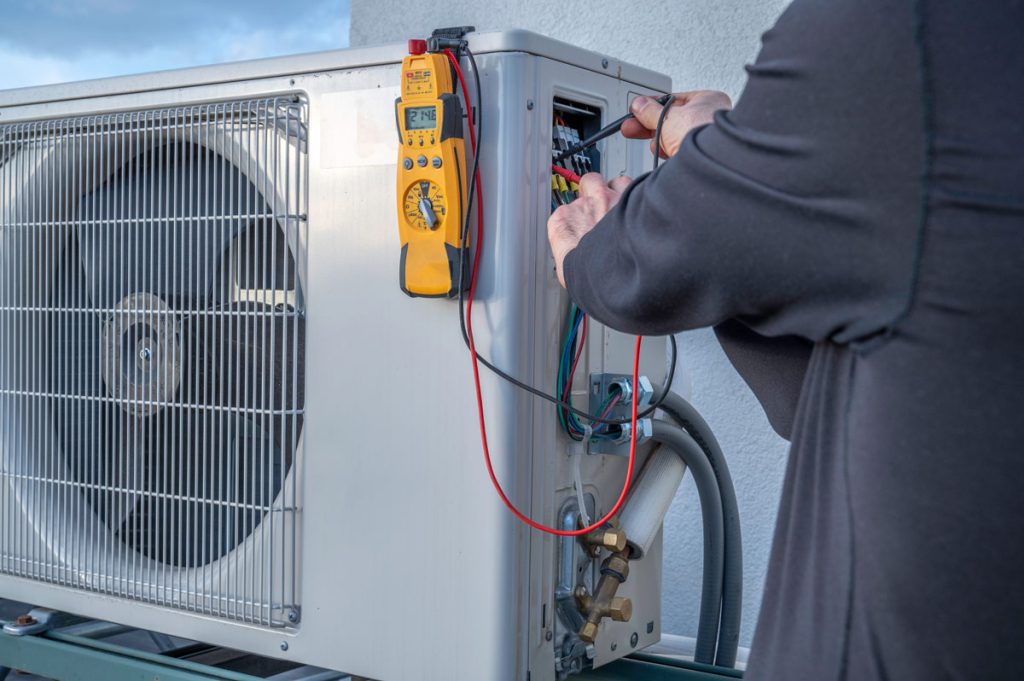
Electrical Issues
Electrical issues are common in home AC systems and can cause problems, from minor malfunctions to complete system failures. One frequent issue involves circuit breakers. If your AC unit frequently trips the breaker, it indicates something’s wrong. This could be because of an overloaded or short circuit within the system. To address this, you might need to reset the breaker or call a professional to inspect and upgrade your electrical panel.
Wiring issues are another common electrical problem. Over time, wires can become frayed or damaged, leading to poor connections and intermittent performance. If you notice flickering lights or inconsistent cooling, faulty wiring could be the culprit. Inspecting the wiring for any visible damage and ensuring all connections are secure is important. Hiring a certified electrician to handle wiring repairs is often the safest option.
Additionally, loose or corroded wires can affect the thermostat, causing the AC to misread temperatures and operate inefficiently. Regular maintenance, including tightening connections and replacing worn wires, can prevent these issues. Always prioritize safety by turning off power to the unit before inspecting or repairing electrical components.
Sensor Malfunctions
Sensor malfunctions in your home AC may involve issues with thermostat placement, faulty sensor connections, or calibration and adjustment problems. Incorrect thermostat placement can cause your system to misread the room temperature, leading to inefficient cooling. Moreover, loose or damaged connections and improper calibration can further hinder your AC’s performance, necessitating a careful check and possible adjustment.
Thermostat Placement Issues
Proper thermostat placement can help prevent sensor malfunctions, which can cause your AC system to misread the temperature and operate inefficiently. When a thermostat is exposed to direct sunlight, it can register a higher temperature than the actual room temperature. This results in the AC running longer than necessary, wasting energy and straining the system. To prevent this, ensure your thermostat is installed so it won’t be hit by direct sunlight throughout the day.
Another common issue is furniture obstruction. If your thermostat is placed behind furniture or near large objects, it can create a micro-environment that affects the sensor’s readings. For instance, a thermostat near a bookshelf or a couch might not accurately reflect the room’s overall temperature, leading to uneven cooling or heating. Ensure that the area around your thermostat is clear of obstructions, allowing for proper airflow and accurate temperature readings.
Faulty Sensor Connections
Faulty sensor connections can lead to inaccurate temperature readings and cause your AC system to malfunction. If your AC isn’t cooling your home as expected, a faulty sensor might be the cause. These sensors help regulate the temperature by communicating with the thermostat, and any disruption can throw the system off balance.
Here are some common issues you might encounter:
- Critical: Wires can become loose over time because of vibrations or wear and tear. Check the sensor connections and tighten any loose wires.
- Sensor corrosion: Moisture and dust can lead to corrosion on sensor terminals, disrupting the connection. Clean the corroded areas with a soft brush or cloth to restore proper contact.
- Sensor positioning: Sometimes, sensors might shift from their original position, causing them to read the temperature inaccurately. Ensure the sensor is properly aligned and secure.
To fix these issues, you’ll need to inspect the sensor and its connections. Disconnect the power to your AC unit before you begin to avoid any electrical hazards. Carefully examine the sensor and its wiring, cleaning any corrosion and securing all connections. If the sensor is damaged beyond repair, replacing it might be necessary. Remember, maintaining your AC system’s sensors is essential for efficient cooling.
Calibration and Adjustment
Calibrating and adjusting your AC sensors guarantees accurate temperature readings and peak system performance. When AC sensors malfunction, they can cause improper temperature regulation, leading to discomfort and higher energy bills. To fix this, start by checking your thermostat settings. Make sure it’s set to the correct mode and temperature.
Next, locate the sensors in your AC unit. They’re usually near the evaporator coils or along the airflow path. Clean any dust or debris around these sensors, as buildup can interfere with their function. A clean sensor is more likely to give accurate readings.
After cleaning, you might need to recalibrate the sensors. Refer to your AC unit’s manual for specific instructions on calibration. This process typically involves adjusting the sensor settings to match the room temperature. Use a reliable thermometer to compare the readings.
Clogged Drain Lines
Clogged drain lines in your AC system can cause various issues, from water damage to reduced efficiency. You’ll often notice signs like water pooling around the unit or an unusual increase in humidity levels. Regular maintenance, such as cleaning the drain lines and using preventive measures, can help you avoid these problems.
Causes of Clogs
Several common factors can lead to clogs in your AC’s drain lines. Understanding these causes can help you prevent them and maintain your system’s efficiency. One major reason is debris buildup. Dust, dirt, and other particles can accumulate over time, blocking the drain line.
Another cause is pipe obstruction. Small insects, mold, or even algae can sometimes enter the pipes, creating a blockage that restricts water flow. This is particularly common in areas with high humidity.
Here are three key factors contributing to clogs:
- Importance of Regular Maintenance: Debris can easily accumulate and cause blockages without regular cleaning.
- High Humidity: Excess moisture can promote algae and mold growth, obstructing the drain line.
- Proper Installation: If the AC unit or its components aren’t installed correctly, it can lead to poor drainage and eventual clogs.
Addressing these common causes can keep your AC running smoothly. Regular maintenance, proper installation, and monitoring of humidity levels in your home can greatly reduce the risk of clogs in your drain lines. By being proactive, you can avoid many common AC repair issues.
Signs of Blockage
Identifying the signs of blockage in your AC’s drain lines early can prevent more serious issues. One of the first things you might notice is water pooling around the indoor unit. This happens because a clogged drain line forces water to back up and spill over. Another clear sign is a musty smell from your vents, indicating stagnant water in the system.
Blocked vents can also be a symptom of a clogged drain line. When the drain is obstructed, excess moisture can cause the air filters to become damp and dirty, leading to airflow obstruction. You might feel reduced airflow from your vents, making your AC less effective at cooling your home.
Additionally, your AC unit may shut off unexpectedly or fail to turn on. This could be a safety feature kicking in to prevent water damage to the system. You should also listen for unusual sounds, like gurgling, indicating that water is struggling to flow through a blocked drain line.
Prevention and Maintenance
Regular maintenance is crucial to preventing clogged drain lines in your AC system. When your drain lines are clear, your air conditioner can function efficiently, reducing the risk of damage and costly repairs. Here are some key steps to guarantee your drain lines stay in top condition:
- Inspect and Clean Regularly: Check your drain lines periodically for signs of blockage or buildup. Use a wet/dry vacuum to remove any debris.
- Schedule Seasonal Checkups: Having a professional technician inspect your AC system during the spring and fall can catch potential issues early. They can also clean the drain lines and other components to ensure smooth operation.
- Monitor Humidity Levels: High humidity can cause more condensation, leading to potential clogs. Use a dehumidifier if necessary to keep humidity levels in check.
Fan Problems
Fan problems in your home AC can lead to inefficient cooling and increased energy bills. One common issue is bearing failure. You might hear grinding or squeaking noises when the fan’s bearings wear out. These sounds indicate that the fan isn’t spinning smoothly, which can reduce airflow and strain the motor. You can either lubricate the bearings or replace the fan to fix this.
Another frequent problem involves capacitor issues. The capacitor is responsible for starting and keeping the fan running. If the capacitor fails, your fan may not start or stop intermittently. You can test the capacitor using a multimeter; if it’s faulty, replacing it is usually straightforward and inexpensive.
Additionally, dirt and debris can accumulate on the fan blades, obstructing airflow. Regularly cleaning the blades will help maintain peak performance. The fan motor can sometimes burn out, especially if it’s overworked. In this case, a motor replacement is necessary.
Ductwork Leaks
When it comes to ductwork leaks, you’ll first need to identify where the leaks are occurring, which can often be done by checking for uneven cooling or higher energy bills. These leaks usually happen because of poor installation, aging materials, or physical damage. To fix them, you can use sealing materials like duct tape or mastic sealant to ensure all connections are secured properly.
Identifying Ductwork Leaks
One of the most common signs of ductwork leaks is a noticeable drop in your home’s cooling efficiency. You might leak if your AC seems to work harder but provides less comfort. To identify ductwork leaks, start by measuring the airflow. Use an airflow measurement tool to check for inconsistencies in different rooms. Uneven airflow can indicate a leak somewhere in the duct system.
Next, evaluate the insulation quality around your ducts. Poor insulation can contribute to leaks and reduce your system’s efficiency. Make sure that all ductwork is properly insulated to maintain peak cooling performance. Look for areas where the insulation appears worn, thin, or damaged.
Here are some steps to help identify ductwork leaks:
- Visual Inspection: Check for visible holes, gaps, or disconnected sections in the ductwork.
- Listen for Air Escaping: Turn on your AC and listen closely for hissing or whistling sounds, which can indicate a leak.
- Feel for Air Leaks: Run your hand along the ductwork to feel for escaping air while the system is on.
Causes of Leaks
Understanding the causes of ductwork leaks is essential to preventing them and maintaining your AC system’s efficiency. One major cause is pipe corrosion. Over time, the metal in your ductwork can deteriorate because of moisture and other environmental factors. This corrosion creates small holes and cracks, allowing air to escape and reducing your system’s effectiveness. It’s vital to regularly inspect your ducts for signs of rust or other corrosion.
Another common cause of ductwork leaks is installation errors. If the ductwork isn’t installed correctly, gaps and misalignments can occur, leading to leaks. Sometimes, the seams between duct sections aren’t sealed properly, or the ducts aren’t fitted securely. This can happen when an inexperienced technician handles the installation or the job is rushed. Ensuring that a qualified professional installs your ductwork can help prevent these issues.
Additionally, wear and tear over time can cause leaks. Ducts can shift, settle, or become damaged by various factors, including home renovations or minor earthquakes. Regular maintenance and inspections can catch these problems early before they become significant issues. By understanding these causes, you can take proactive steps to keep your AC system running efficiently.
Repair Techniques
To effectively repair ductwork leaks, start by locating the exact spots where air is escaping. This step is important because even small leaks can reduce your AC system’s efficiency. Begin by inspecting all duct joints and connections for visible gaps or holes. You might also notice airflow inconsistencies in different areas of your home, which can help pinpoint problems.
Once you’ve identified the leaks, cover them with mastic sealant or aluminum foil tape. These materials are durable and specifically designed for ductwork repairs. Avoid using standard duct tape, as it tends to degrade over time.
Here are some key steps to follow:
- Clean the area around the leak to ensure a good bond with the sealant or tape.
- Apply mastic sealant with a brush or caulk gun, spreading it evenly over the leak.
- Press aluminum foil tape firmly over gaps, smoothing out wrinkles to guarantee a tight seal.
While addressing ductwork leaks, look for other potential issues, such as compressor failure or the need for capacitor replacement. Regular maintenance can help prevent these problems from escalating, improving your AC system’s overall performance and lifespan.
Insufficient Cooling
Experiencing inadequate cooling from your home AC can be frustrating, especially during the hotter months. One common cause could be blocked vents. Ensure all vents in your home are open and not obstructed by furniture, curtains, or other items. Blocked vents can restrict airflow, making your AC work harder and less effectively. Another issue might be incorrect settings. Double-check that your thermostat is set to the desired temperature and in cool mode. Sometimes, simple adjustments can make a significant difference.
Another potential problem could be a dirty air filter. Over time, air filters can get clogged with dust and debris, reducing airflow and cooling efficiency. Replace or clean the filter regularly, usually every one to three months, depending on usage and filter type. Also, inspect the outdoor unit. Make sure it’s free of debris like leaves, grass, or dirt, which can impede its function.
Lastly, check for refrigerant leaks. Low refrigerant levels can diminish cooling capacity. If you suspect a leak, contact a professional technician to handle it, as dealing with refrigerants requires special knowledge and equipment. Addressing these issues can improve your AC’s performance, and you can enjoy a cooler home.
Conclusion
Keeping your AC in top shape is all about regular check-ups and addressing issues promptly. If your thermostat isn’t cooperating, your refrigerant is leaking, or your filters are dirty, don’t wait. Tackle frozen coils, electrical hiccups, and clogged drains quickly. Remember to inspect your ducts and make sure fans are spinning smoothly. Staying on top of these common problems will keep your home cool and comfortable without breaking a sweat.
Frequently Asked Questions
For energy efficiency, you should set your thermostat to 78°F in summer and 68°F in winter. Proper thermostat placement and seasonal adjustments guarantee peak performance, minimizing energy consumption and keeping your home comfortable year-round.
Improving your AC’s energy efficiency can feel like conquering Everest. Optimize airflow by regularly cleaning filters, sealing ducts to prevent leaks, and ensuring your thermostat is set correctly. These steps will transform your energy savings dramatically!
Yes, smart thermostats are often compatible with older AC units. To guarantee smooth integration and peak performance, you should follow the installation guidelines and address any compatibility concerns by checking your AC’s wiring and voltage requirements.